Showing posts with label organizing. Show all posts

Monday, 3 June 2013

Office Re-decorating

If you've been around here for a while, you'd remember when I first got my new job I wanted to spruce up my cubicle a bit.

I had a couple posts of my cube before and then about some of the things I'd made for it here and here. 

I now present to you the new look for my cubicle.

These coasters were from tiles I'd bought at ReStore.  Except this isn't the color the tiles originally were.  They were white with grey specs.  I spray painted them and then stamped them with Staz On ink! 

 photo coastercollage_zps0b2fdf9b.jpg

Now another problem I had was that I have a lot of coil bound books (Canadian Electrical Code, and training manuals, cuz I'm cool like that!) that just don't stand nicely on a shelf.  I bought some plain magazine holders, and guess what - spray painted those too! Then I hot-glued a little scrapbooking label thing to the front!

 photo magazineholders_zps23309009.jpg

Here's some other details that I have kicking around - magnetic spice jars for paper clips, rubber bands, etc.  magnetic Martha Stewart notepad, reed diffuser, and vase with artificial flowers for a pop of color.  The vase filler is just coffee beans.  I got them from my dad's condo after he passed away because by that time I figured they were pretty old, and so bam! perfect for vase filler!

 photo Detailscollage_zpsf738fe33.jpg

I really like my little homey touches to my office and I hope you do too!

Sunday, 24 February 2013

Staging a Condo Part 5 - Bedroom

We're almost done with all this condo jazz...

If you've missed any of the series and would like to catch up, please follow the links:
Part 1 - Kitchen
Part 2 - Living Room
Part 3 - Bathroom
Part 4 - Office/Entrance

The first thing you'll notice is that this room is painted a very unique color.  Definitely not for everyone.  If I had had the budget to, I would have painted it a more crowd pleasing neutral color.  But it does amuse me that this paint is called "pirate yellow"!

Photobucket

The bedroom was one area that needed to be cleaned up a lot, as you can see by the top right picture!  Notice the runners beside the bed that make it look really busy? Those were moved into the entrance way!

Photobucket

Before there really wasn't much storage for clothing.  Just a dresser, and rolling clothes racks (not appealing!)  So I move that mirrored wardrobe that used to live in the front entrance upstairs.  I chose the mirrored one because - it helps reflect more light AND all the bedroom furniture is blackish brown...that piece is light birch.  The mirrors help it blend in.

Moving the wardrobe up here helps take away the objection that someone might have to moving into a loft style condo that has no closets built in.  In a way that's really what you're trying to do when you stage a home.  You want to remove any objections someone might have to buying it.

I also moved the bed away from the short wall.  When you walked into the bedroom, this was the first thing you saw, and it's not very private.  I had moved it opposite the mirrored wardrobe, but then my realtor and I moved it again to the wall that it's finally on.  Here again, I put the lamps on the outlet that's controlled by the light switch because there is very little lighting in this room.

2FE39553-EB0B-4A58-8209-D6E14D99BC36-3891-0000041491586F21, Uploaded from the Photobucket iPhone App

Tips for making the bed look it's best:

  • I created an exaggerated headboard using privacy screens that are actually broken.  They're just tucked up against the actual headboard. 
  • I tucked the comforter into the base of the bed.  This gives it a really nice tight fit and looks really clean!
 UndertheTableandDreaming   Sumo's Sweet Stuff  I Heart Nap Time Keeping It Simple

Sunday, 10 February 2013

Staging a Condo Part 4 - Office

If you missed anything so far please be sure to catch up!
Part 1 - Kitchen
Part 2 - Living Room
Part 3 - Bathroom

The back of the loft was a hard space to deal with because it had always served as a bit of a storage room so to make it look like a useful, purposeful space was tricky.

Photobucket

Continuing the thread here, TIDY UP!!

I staged this area with a few antique and vintagey items that were laying around such as the typewriter, adding machine, and fan.  This is a good general reminder - if you have cool things - put them on display! 

As you can see, there was a coffee table here that got moved into the living room.  The other thing I did was add some lighting to this room.  The two lamps I put in here are plugged into the outlet that is controlled by the light switch - again, this makes a better impression for someone viewing the condo it takes some of the hassle out of adding lights.

This space is "walled off" by a couple of bookshelves.

EA5E6ADF-C592-489A-8866-76A4DE22B43B-5891-0000052E098CE46D, Uploaded from the Photobucket iPhone App

Again make sure what you put on the bookshelves fits the vibe you're trying to create.

4F7C2EC0-EF1F-4E79-83E7-9C4002447516-5891-0000052E5D3EF623, Uploaded from the Photobucket iPhone App

The IKEA PAX wardrobe helps define the space here too.  I hung the framed posters up on the wall because this was again a big plain, empty wall.  These were already in the condo, framed and everything BUT never hung up!! AHHHH!!

On the other side of the wardrobe is the entrance.
387FDBE4-6D0A-4FB7-B863-702714818055-5891-0000052E0DB68DB3, Uploaded from the Photobucket iPhone App

I picked up a full length mirror for less than $10 and hung it lengthwise on the wall to help make it fee like more of an entrance AND had the added bonus of reflecting more light.  The runner at the front door is actually 2 runners that I moved out of the bedroom.  Unfortunately the front door doesn't have much clearance so I couldn't pull them closer to the door.  Again, it's all about first impressions, when trying to enter and the door gets stuck on the rug, it already feels like a house you wouldn't want to buy!

I don't really have any "new" tips for staging an office area or entrance, but as always - neat and tidy is key.  Add lamps on switches and timers when you can, and mirrors can also help brighten spaces too.


Sumo's Sweet Stuff    Keeping It Simple

Friday, 25 January 2013

Staging a Condo Part 3 - Bathroom

We're moving onto tips and tricks for your bathroom when staging your house.

If you missed part 1 - the kitchen, or part 2 - the living room, be sure to check them out.

Photobucket

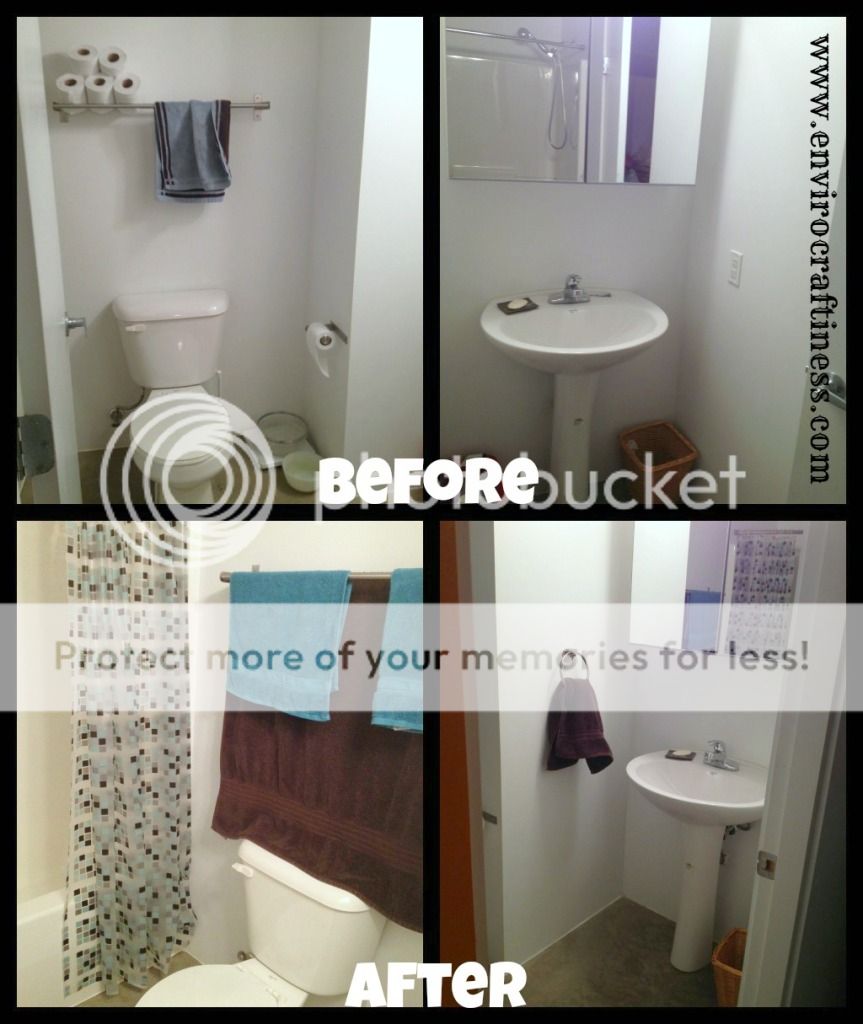
I had already cleaned a lot of junk out of the bathroom by the time I took the before pictures, but there was still work that needed to be done.

First and foremost it is important for your bathroom to be CLEAN CLEAN CLEAN.  Empty the garbage, and SHINE up the faucets! This makes such a huge impact.  When I have people come over sometimes I cheat cleaning my bathroom and just shine up the sinks so it looks like I cleaned ;)

For the bathroom I bought a new shower curtain because the one that had been in here was plain white.  Take a white bathroom, add a white plastic shower curtain, and you've got...ick.  Because I was on a budget, this one came from the dollarstore.  Not exactly the sophisticated look I would like, but the colors worked.  I bought the teal towels too to add a bit of pop to the room.

I also hung a towel ring by the sink.  This wasn't there before, and it really helps add something to that wall, and is functional.

A nice soap dish/pump can also be a nice touch.  Maybe some candles. I just couldn't be bothered :)


In this condo, the laundry area is just outside the bathroom.

Photobucket

Before it was cluttered and messy.  I put the detergent and softener on top of the washer and dryer, and stored all the clean towels rolled up in one of the laundry baskets.  (the other two baskets I used elsewhere, you can see the one in the living room, another one will show up later in the bedroom)

Important things to remember in the bathroom:

  • Keep it clean.  SHINE your sinks! 


Saturday, 19 January 2013

Staging a Condo Part 2 - Living Room

If you missed the first post in this series, be sure to check out how I staged the kitchen in Part 1 HERE.

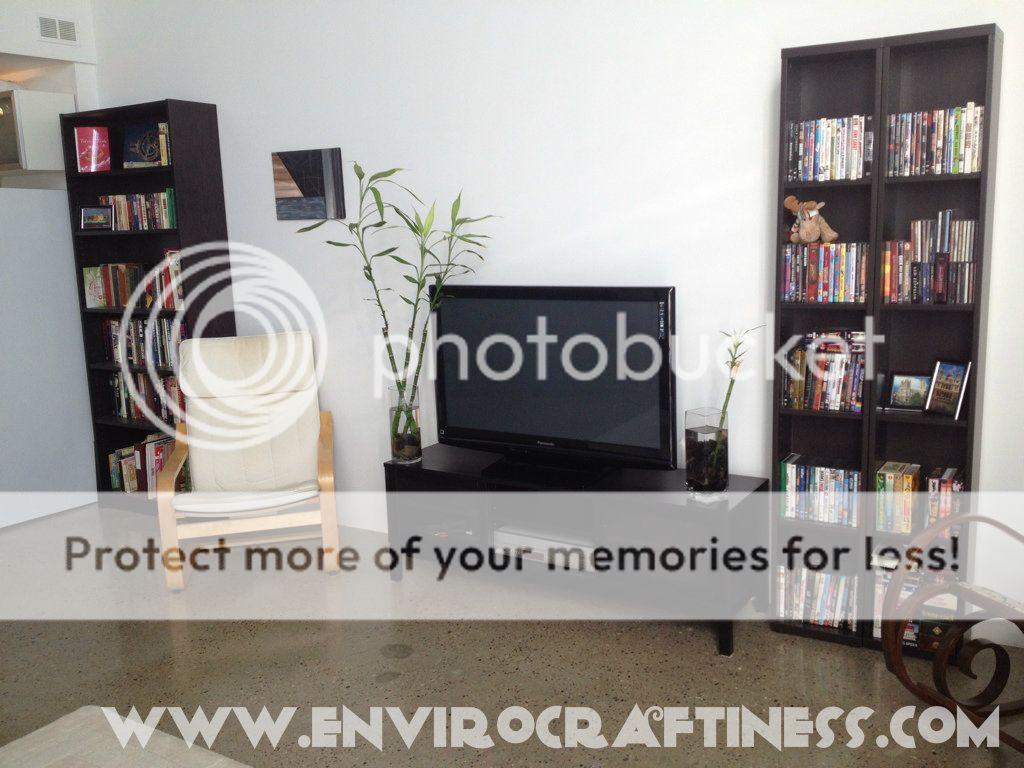
We're going to move onto the living room.  This was my favorite room to do but also quite challenging.  I found that I really could have had twice the amount of furniture in the whole condo.  I ended up pulling pieces out of other rooms to complete the living room because I felt it was important.

Photobucket

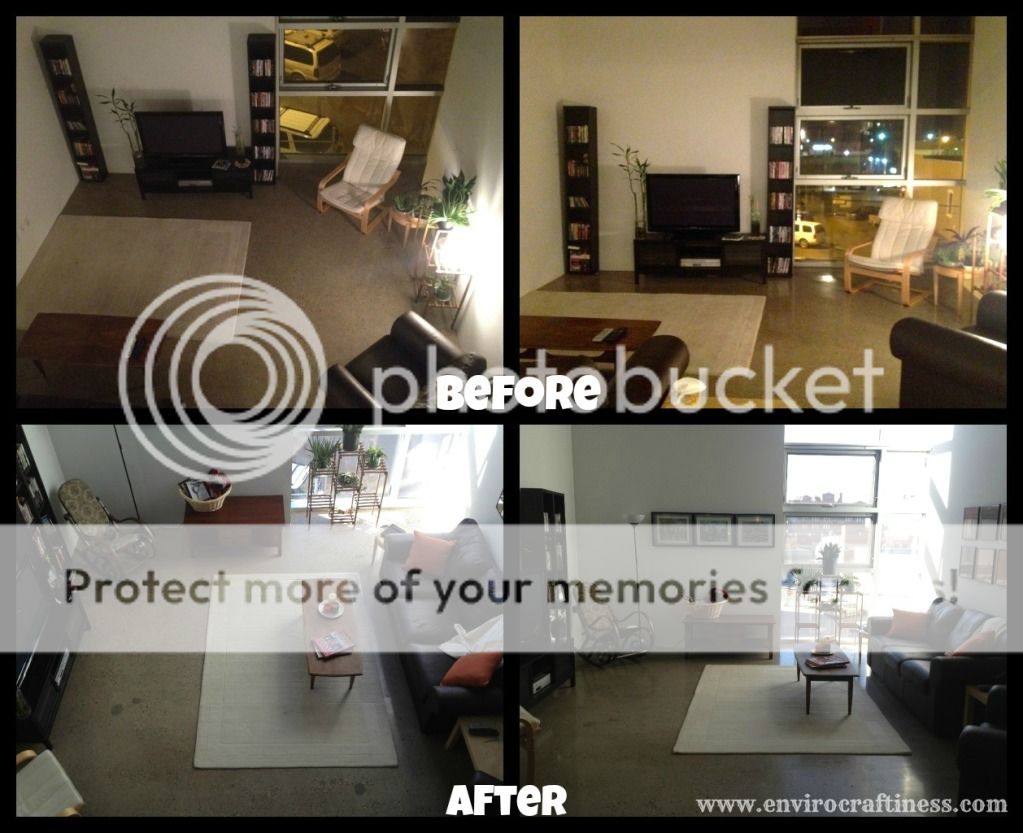
Because I emphasized this in the last post I'll just briefly touch on it here.  Lighting is key to taking photos - note the yellow before photos vs. the crisp, clean feeling after photos.

Before this living room didn't feel finished.  Everything was on the left wall, the area rug was floating in the middle of nowhere and the dvd/cd book cases that flank the tv look like awkward pillars on either side of the tv.  It lacked FLOW and BALANCE.

I turned this whole room 90 degrees anti-clockwise.  I was afraid that this might make the loft feel like a bowling alley because of it's shape, but it didn't. This game the living room more purpose and created good flow in the room.

The plants on the plant stand are VERY happy in the window. :)

Another small thing I did with large impact was hang appropriately scaled pieces on the walls.
Photobucket

If you take a look at the above befores, you'll see two small pieces of art on the one wall and that is all.  These pieces are far too small for the wall (the ceilings are like 20' high!!!)

Large artwork is expensive, not to mention a big commitment.  So what I chose to do was hang collections of smaller pieces using what was available.

Frames above couch, Uploaded from the Photobucket iPhone App

Over the couch I hung a bunch of scrapbook paper in 12x12 album frames that my dad had already purchased!! They were all just sitting in a box.  Empty!!

A good guideline for where to hang things above your couch is about 6-8" above the top.


Paris Prints wall art, Uploaded from the Photobucket iPhone App

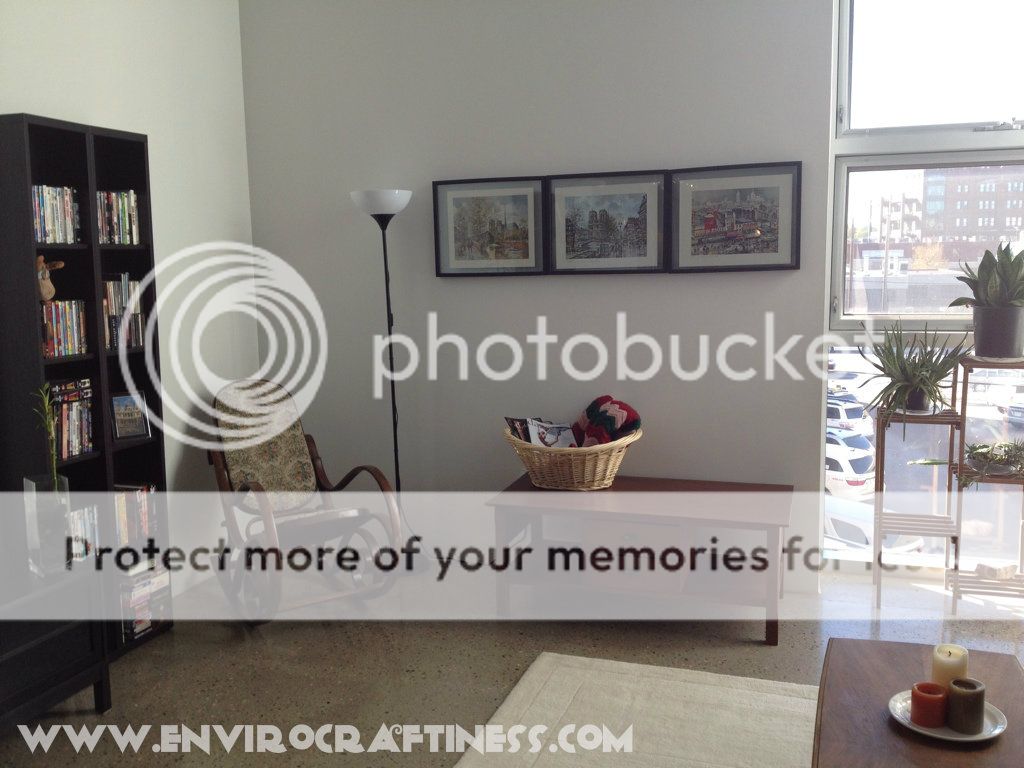
On this wall I hung some framed prints that my dad bought when he and I went to France when I was in grade 11.  He already had the prints, but not framed.  Because I was on a budget and these are European prints, they don't fit in standard North American frames (although I've heard IKEA can be good for finding frames!)  I purchased "floating" glass frames from Michael's.  These frames had 2 panes of glass that sandwich the art and that way it didn't matter that I couldn't find an exact fit.

70AB471D-C06C-4423-9873-80F12EEFBE27-3891-00000409AEE6BBBE, Uploaded from the Photobucket iPhone App

Here you can see that I pushed the 2 small book cases together to match the full size one that was already in that other corner.

Photobucket

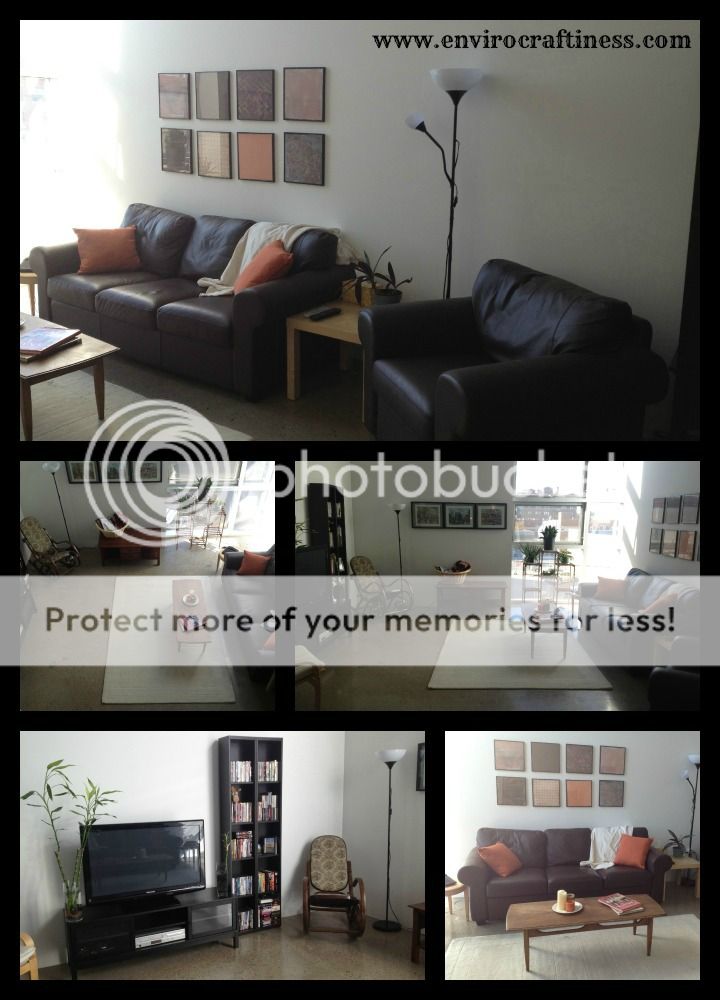
The above is a summary of the pictures I took in the living room.


  • I changed the layout of the room to make it more functional
  • I hung appropriately sized pieces on the walls
  • I added additional stand up lighting to the room - I put the lamps on timers so that when people came to view the condo in the evening the lights would already be on.
  • I also added some additional furniture - namely that rocking chair next to the TV and the coffee table under the European prints.  These pieces were in other rooms, but I felt they were needed in the living room to make a more complete setup. 

When staging a living room - consider PURPOSE, FLOW, BALANCE, and as always, make it NEAT & TIDY! 


Sunday, 13 January 2013

Staging a Condo Part 1 - Kitchen

Alright, over the next few days I'll be taking you through what I did to stage my (late) father's condo to help it sell as quick as possible!  It was kinda a fun process because it was like decorating a house (on a tight budget) that no one would be messing up! I bet there are a lot of jealous craft/decorator moms out there :P

This whole series will be a few posts long as to not overwhelm you a with a dump load of photos!

We're going to start with the kitchen.

Photobucket

The most important thing here is to DE-CLUTTER your countertops.  This is easier for some people to do than for others.  As you can see, that's all I've really done here.  Some people might argue that you should clear EVERYTHING off, but generally I disagree - here I've left out some canisters, coffee maker, paper towel holder and the toaster.  When people are looking to buy a home they need to see how and why the home you're trying to sell fits their needs.  I felt that because these appliances added a pop of color to an otherwise white kitchen, they should stay.  I did however give them a really good wipe down so that they were clean and shiny!  Make sure you clear off your fridge too and give that a good wipe down, especially the handle!

While you're staging, this is a great time to go through and get rid of things you don't need - you will eventually be moving, so it would be a good exercise to start downsizing now!

If you are listing and selling your home yourself (ie NOT using an agent) be sure to take good photos.  People want to see the space so you need to give them the best impression so that they want to come look at it. For example, the top photo is a little bit dark because it was taken late at night.  If I were listing it myself, I would have waited until a better time (like in the after photo) because it makes a better impression. I used an agent because there are a TON of advantages to it (especially because I'm extremely new to this process I needed all the help I could get).

Photobucket

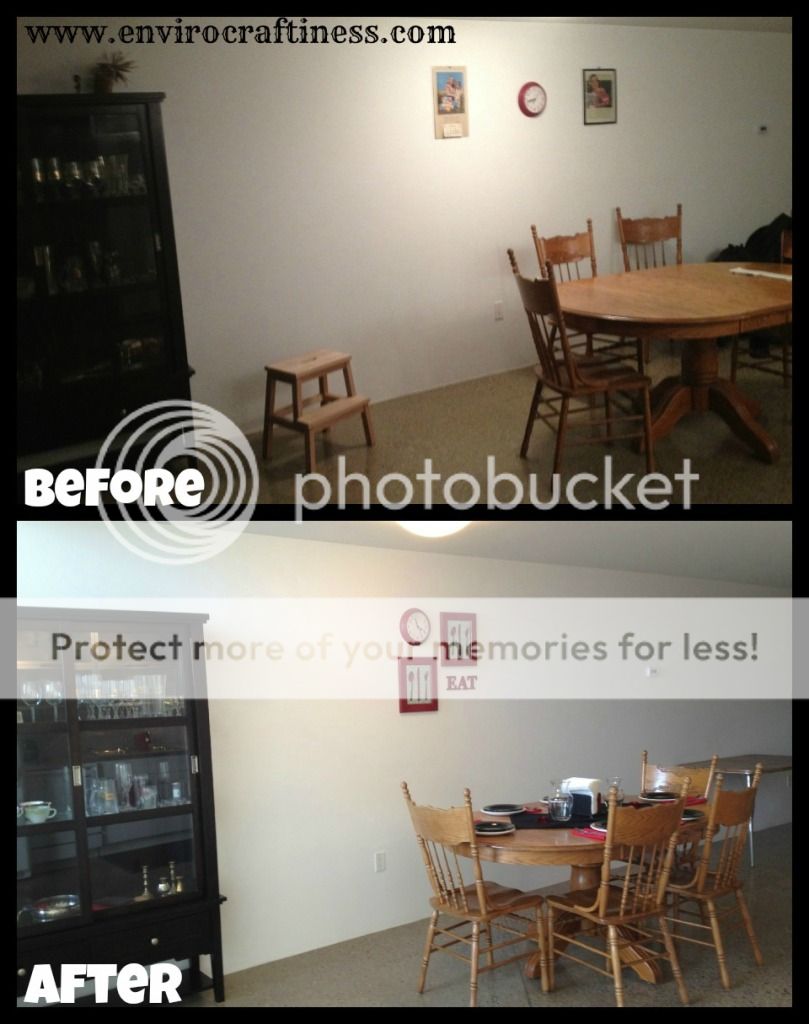
On the reverse of the kitchen counter wall is the "dining area."  I would have really liked to replace the kitchen table and chairs because they're quite out of place in a modern styled loft, but it just wasn't in the budget.  Actually what I really wanted to do was refinish the table with that black-brown color to match the china cabinet and replace the chairs with something like this:
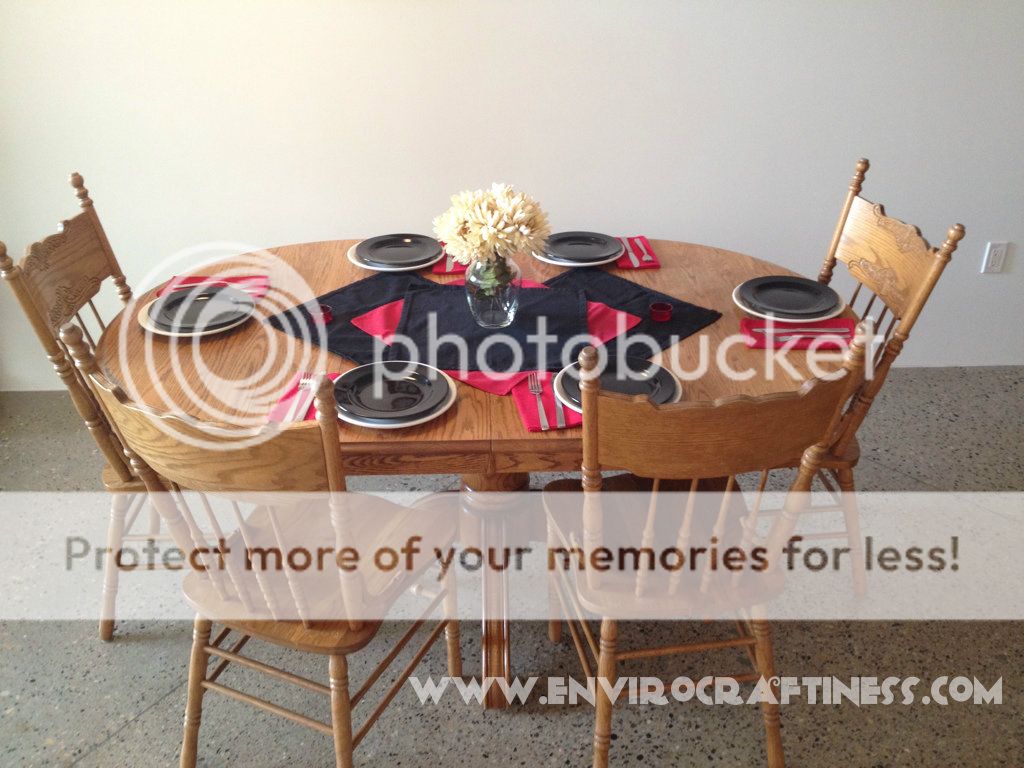
But anyway, setting up a cute tablescape was the best I could do here.

2CA80620-0714-4DF7-91BB-969C047A2718-3891-00000404BDE2283F, Uploaded from the Photobucket iPhone App

The goal was to make the table look as full as possible (hence 6 place settings and only 4 chairs! :P)  I set napkins in the middle because I didn't have a runner, and in the vase are some fake flowers that I picked up on sale from Michaels.

45460D5C-46C8-4104-835C-492C6DB15079-3891-00000404D0884B26, Uploaded from the Photobucket iPhone App

Another shot here will the wall art I had made (check out the tutorial for it here).

So if you glance back at the before and after, again you will notice the difference lighting makes when you take your photos.  The wall art is a new addition, looks a lot more concise and "planned" than the old Coke poster and vintage calendar that were hanging there before.  I also moved the china cabinet more into this dining area (if you look closely at the electrical outlet you can see how it's moved).  It felt like it was floating into the living room a bit, and it was out of place.

So there you have it for your kitchen & dining room!  Remember to create good lighting and reduce clutter!  


Keeping It Simple

Sunday, 2 September 2012

Chalkboard clips

I have been on a bit of a chalkboard paint kick for a while now.  I even have a whole chalkboard pin board.  I wanted to try to bust some stash while I was at it, so I came up with clothes pin chalkboard tags.

I started by painting some clothes pins I had lying around from this photo board project:

painted clothes pins 

I then cut pieces of ~2"x3" balsa wood that I had leftover from my zen garden project and sprayed them with chalkboard paint. 

I was debating whether I wanted to make them into picks like this, which was my original idea,

But then I also saw that someone had put them on clothes pins.  I liked the clothes pin idea better because I thought I might be able to find more uses for them.

One of my favorite ideas was to use them as lunch clips
lunch bag clip

This would be perfect if you have a few people in the family brown-baggin' it!

Currently I'm using them to label my craft storage shelves
chalkboard clips


chalkboard clip2

chalkboard clip

This was a great stashbusting project that cost me NOTHING and it turned out really cute!

I Heart Nap Time UndertheTableandDreaming Keeping It Simple


Tuesday, 13 September 2011

Packing for a crop!

This coming weekend I'm attending a crop and bringing along my bestie Amy - who has never been to any kind of scrapbooking event.  She wasn't sure how she should pack/what she should bring and wanted a little bit of help, so here it is!

There's 2 main ways to pack for a crop:
1) Page kits - for the organized
2) Take (almost) everything - for the rest of us

Page Kits:
This method of packing is for those people who are organized and have the time before hand to prep.  I am not one of those people - I'm far too indecisive.

Making page kits is a pretty simple concept.  You collect your photos, paper to go with, and embellishments to match.

Photobucket

A kit might look something like this (taken from memory workshop pdf):

Photobucketo        1 or 2 sheets of patterned paper 
o        some kind of sticker or embellishment 
o        Title material (sticker or rub on letters, diecut, page topper, etc) 
o        1 or 2 sheets of cardstock for your base page  
o        1 or 2 sheets of cardstock in different shades for matting and accents 
o        Finishing touches (ribbon, flowers, brads, eyelets, etc) 

PhotobucketPhotobucket


All these items can then be stashed away in a large ziplock bag, and there you have it.  In addition to your kits you'll need to bring the basics (adhesive, scissors, trimmer, pens, etc)

Things to consider when packing with page kits:

-Be realistic.  If it takes you 1 hour to finish a layout, packing 20 page kits for an 8 hour crop is probably not the best use of your time.
-if you like making mini albums a crop is a great way to complete one or two.  You can pack only what you'll need for that album and be done with it!

Method 2 - Pack everything
Alright, when I say everything I don't really mean it.  This is the way I pack and it works well for me because at home I don't have a permanent scrapbook area, so things are packed and stored away more of the time.  Keep in mind I don't have a lot when it comes to supplies... well compared to a lot of people!

Paper:
I have a whole little suitcase thingy full of it. It's arranged by color because I'm like that.

Photobucket

Photobucket

Scraps:
I can't bear to cut one little shape out of a fresh piece of paper, so my scraps come with me all the time. Mine are organized in one little box.  Each color is in it's own page protector, making it much easier to find and use.

Photobucket

Embellishments/finishing touches:
Mine are stored between 2 containers.  One is a fishing tackle kit (these work great because they have  all the compartments you need without the high price of some of the stuff made specifically for scrapbooking - although there are some good organizers out there for that too!) this keeps all my brads, most of my ink pads, ribbon, flowers, etc.  

Photobucket

Container 2 contains mostly rubber stamps.

Photobucket

Photobucket

My stickers & rub ons, sadly, are currently housed in a Michael's bag!  *gasp* These will be coming too.

Photobucket

Somewhere to put finished work:
You want to be able to protect your finished work.  Maybe it's a full 12x12 album, but for me, it's the box my MacBook came in.  It fits 12x12 paper perfectly!  I usually store some idea books in here to take with me too!

Photobucket

Photobucket

Things to consider with this packing method:
-how much space is there?  Some crops will be limited for space, and you need to consider your fellow scrappers!  If you don't know, pack light, or leave some things in your car!

-consider how you will spread out your belongings.  If you can't see it, chances are you won't be inclined to use it!

Photobucket

I usually keep this guy out & fill the lid part with stickers & rub ons (ie contents of plastic bag) and that way things I need are handy!

-how long is the crop? Is it worth loading every brad and sticker into your car for a 4 hour crop or are you there all weekend?
-is there a shop? Often crops are hosted by people who have shops or consultants who sell product.  If there is a shop, maybe every rubber stamp you own doesn't need to come with.

-do you have friends attending?  Sometimes you can cut down on what you would like to bring because you have friends that you could share with.  For instance, you don't all need to bring every punch you own because Suzy and Sally own them all too.  Coordinate if you need to!

-another big thing lately is the use of Cricuts and Silhouettes.  Some crops outright will advise you not to bring them.  I understand both sides of this debate.  From the host's perspective, they take up space, not everyone has one, and they can get in the way and can take away from some of the fun.  From a scrapbbooker's perspective, it's nice to have - just in case!   Keep in mind that each one of these devices needs to be plugged in, and outlets might be limited.  Perhaps you have a few doo-dads that you like to use regularly, pre-cut these, or some titles so that you don't have to bring your machine with you.  (again, consider the length of the crop & space limitations!)

-consider what you use the most.  Do you own 500 rubber stamps but find yourself using stickers most often?

General things to consider:
-bring scrap paper and/or post it notes (I always find these useful!)

-if the crop allows, you might want to bring snacks (be considerate of your fellow scrappers & don't bring really messy things - no body likes someone else's coffee stains on their layouts & cards!)

-BUTT/back pillow - always a good idea!!

-layered clothing - you never know what the temperature of the crop room will be!

-label your tools.  Sadly things go missing suspiciously at crops sometimes, but if you put your name on your stuff you'll be likely to get it back.  This is important if you plan on sharing amongst friends (who brought the crop-a-dile again?)


There's a whole bunch of resources out there, and I know that I didn't cover everything, but it's a good start if you've never been before.  I found this link from memory workshop particularly useful.  It talks about page kits, but has some other general information that's good to know too!

How do you pack for a crop? What are your must have items? What do you wish someone had told you before you went to your first crop?